Grounds For Sculpture VR/3D Montage


montage_6x_1440.vr.jpg


I made this VR photo montage from 3D photos I shot a few years ago at the Grounds For Sculpture in Hamilton, NJ. It was made with http://cctoolkit.vectorcult.com/ toolkit for Google Cardboard Camera app VR photosphere image format. 

Download the photo to the DCIM/CardboardCamera folder on your Android phone, then view with the Cardboard Camera app or supporting file viewer. REQUIRES 2136 x 1440 display or larger, and works with the Samsung S6 smartphone. 

Enjoy!

UPDATE 2015/12/31

I shot the stereo photos with twin Olympus Pen E-PM2 cameras and Panasonic 14mm fixed lens (28 mm equivalent 35mm lens.) Image sensor size is 17.3 mm x 13.0 mm (4/3). The FOV (field of view) used for the XMP GPano parameter calculations was 49.7 degrees (vertical) instead of the horizontal FOV of 63.4 degrees for this camera/lens combination. I used the following calculators for FOV: field of view calculator and angular field of view calculator

---- XMP-GPano ----
Cropped Area Image Height Pixels: 1440
Cropped Area Left Pixels        : 0
Cropped Area Top Pixels         : 1887
Cropped Area Image Width Pixels : 10524
Initial View Heading Degrees    : 90
Full Pano Height Pixels         : 5215
Full Pano Width Pixels          : 11307

See http://andymodlaphotography.blogspot.com/2015/12/create-vr-photos-for-google-cardboard.html


Create VR Photos for Google Cardboard Camera App

UPDATED 2015/12/28 
Correction 2016/05/01

Google's Cardboard Camera app can shoot and view VR/3D panoramic photos with your Android phone. After using it a while my opinion is that the app is amazing, but unfortunately the image quality is not as good as a 3D camera and sometimes the photos gives me eyestrain. The app has a viewer mode for the 3D panoramic photos you shoot with the app, but does not provide any way for me to see 3D photos I have already created in other formats.

Thanks to the work of Andrew Perry, he wrote a web app Cardboard Camera Toolkit that will Split a VR photo from the Cardboard Camera app into left and right images and a mode to Join left and right images to create a Cardboard Camera VR image. You might want to do these operations so you can edit your photo and then replace your original VR photo with your new version. This can also be used to help you replace or edit the sound portion of the VR photo.

I have stereo photos that I would like to view in the Cardboard Camera app and with Andrew Perry's Cardboard Camera Toolkit Join procedure I can do this. 

When I connect my phone to my PC USB port, the VR/3D photos I shot are found at:

PC\Galaxy S6\Phone\DCIM\CardboardCamera

This is where I will store my finished VR photos.

I took a stereo photo with a FujiFilm W3 3D camera to get a MPO file format 3D photo. Using the Stereo Photo Maker toolkit, I split the W3 MPO 3D photo into left and right images, aligned the original left and right images, and saved the aligned left and right pair as JPGs appending_left and _right to the filenames. 

The image sizes for the photo pair are identical but smaller than the original left/right pair due to alignment. The original image size was 3584 width x 2016 height. Here are my example aligned photos, 3427 width x 2002 height.

Left

Right

Because the Cardboard Camera app expects panoramic images, I have to set the XMP parameters in the image file. See Google's photo sphere XMP metadata description. Since my 3D photos are not panoramic I made adjustments to the XMP parameters as follows:

The FujiFilm W3 camera shoots with a 62 degree field of view since it has a 35 mm equivalent lens. See the BH Photo Video Angle of view chart. The photos above were cropped so that the FOV changed to 59 degrees for this photo.

(3427 / 3584) x 62 = 59

Using the photo width 3427 pixels, the 360 degree full pano width is calculated as

(3427 x 360) / 59 = 20810

Using the photo height 2002 pixels, the 180 degree full pano height is calculated as

(2002 x 180) / 59 = 6108

I calculated the CroppedAreaTopPixels as half the difference between the pano height and cropped image height.

(6108 - 2002) / 2 = 2053

I copied the left and right images into the Join procedure toolkit box and set the XMP properties using the advanced drop down menu.

GPano:CroppedAreaLeftPixels   0
GPano:CroppedAreaTopPixels   2053
GPano:CroppedAreaImageWidthPixels   3427
GPano:CroppedAreaImageHeightPixels   2002
GPano:FullPanoWidthPixels   20810
GPano:FullPanoHeightPixels   6108
GPano:InitialViewHeadingDegrees   90

Click on the Join button and download the output photo from the Join procedure:


6BXrkroSFHx.vr.jpg


I copied this to the DCIM/CardboardCamera folder on my phone and it shows up in the Cardboard Camera app when started.

Thanks Andrew Perry!

My photo was taken at the Bonnet House, Museum and Gardens in Ft. Lauderdale, Florida last September.

Here are parameters for the same photo to show it zoomed. The parameters were determined by experimentation:


GPano:CroppedAreaLeftPixels   0
GPano:CroppedAreaTopPixels   1001
GPano:CroppedAreaImageWidthPixels   3427
GPano:CroppedAreaImageHeightPixels   2002
GPano:FullPanoWidthPixels   6854
GPano:FullPanoHeightPixels   4004
GPano:InitialViewHeadingDegrees   62

CrChAx9RBs8.vr.jpg

Holiday Nutcracker Light Painting

Nutcracker Envy
During a recent photo shoot I had an opportunity to do some daytime light painting with model Mely who posed for me. Here Mely protects a bag of peanuts from the hungry Nutcrackers painted in the background using my latest version 3 LED light stick. She did excellent work posing and remaining still during the long exposures.

My camera is on a tripod as I trigger the camera shutter from the light stick to begin painting the background.


I didn't move out of the way in time, so I did some Photoshop work to remove me from the photo above. I wish I had worn a black shirt. A strobe flash at max setting fired at the end of the 13 second exposure using the camera's rear curtain flash setting. My camera settings were F11, ISO 200, 24 mm lens with a 3 stop neutral density filter. The LEDs are so bright at the subject distance (10 ft.), I needed the ND filter.

In Photoshop I had some fun animating the Nutcrackers in a GIF file:


A photo where I purposely used only the light stick to illuminate the photo capture wrapping light around Mely.


Upside down:


A block diagram of the setup:

The light stick features a 228 LED neopixel strip from Adafruit controlled by a Teensy 2.0 microcomputer board, linked over Adafruit CC3000 WiFi to an Android tablet for loading images into the stick's SPI SRAM 512K byte memory storage. I wrote the controller software with Arduino IDE and libraries from Adafruit.

A diagram of the LED stick controller major electronic components:

The actual LED stick controller circuit before mounting in a box:

HTTP protocol for loading images using the stick's web server:

Here is a screen shot of the Android tablet app I wrote to load the Nutcracker image. I coded it in Java with Processing libraries using Android Studio as the IDE (integrated development environment). With some code changes I could convert it into a Java PC notebook application because it's Processing based. 


Stereo Photography with Twin Sony Action Cameras and Google Cardboard


Up to five Sony HDR-AS200V action cameras can be controlled simultaneously with the Sony Remote PlayMemories Mobile app for Android. I saw the potential for stereo photography with this camera system when I read its specifications. With prices dropping now because 4K models supercede this camera, for less than $500, I bought a pair of HDR AS200Vs including waterproof enclosures.

The form factor for the lightweight camera is ideal for 3D due to its slim design. For closeups I can mount two cameras side by side for a minimum interaxial separation of 25 mm without the waterproof enclosures. In the setup pictured above the interaxial camera separation is 65 mm, the same as adult humans.

I can shoot 3D 1080p video and the camera shoots JPG stills at a pixel resolution of 3104 width x 1704 height, which is lower than the specifications published on Sony's website, but adequate enough for viewing with a smartphone. Unfortunately there is no control of shutter time since everything is automatic. On the flip side this disadvantage does make it easier to use these cameras for stereo because there are no manual controls to fiddle with on both cameras.

In bright sunlight it is hard to use a phone as a camera remote control viewer. I solved this problem by mounting my Sony Z1S phone in a Google Cardboard VR viewer. The pictured viewer above is custom homemade from Google Cardboard plans version 1. I use lens for stereoscopic viewing from Berezin 3D. My Cardboard viewer looks beat up because I use it so much. With a hole cutout on the right side I can insert my finger to tap the app's shutter button. I attached my twin camera mount on top of the Cardboard viewer so I can easily photograph stills or shoot videos at the same time viewing my subjects in 3D. Sweet!


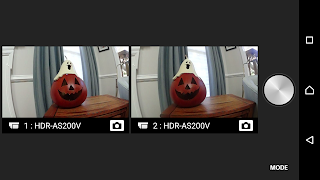
Screenshot of Remote PlayMemories app 


Photos downloaded from cameras to the phone. Not exactly same as screenshot view because I could not take screenshot with the camera in the viewer.


Merging left and right images into parallel stereo photo with Stereo Photo Maker. I can't explain the color shift in the two photos, guessing AWB auto white balance was computed differently in each camera. Of course I can correct color temperature in the photos to match using Lightroom and correct the lens distortion that is more obvious in wide shots. I use Magix Movie Edit Pro Plus 2016 to align and edit the twin camera footage to create 3D videos.

The PlayMemories app is not completely ideal for stereo photography. I emailed the following suggestions to Sony to improve their app for stereo photography, so hopefully they will implement them.


1. When two cameras are connected show the two live video full screen side by side, by moving the shutter button to the bottom right side below the two camera images. This gives a bigger display for the video which is good for viewing with a stereoscope or VR viewer like Google Cardboard. For 1, 3,4, or 5 cameras the current layout is fine.

2. My phone may not be accessible to press the screen shutter button, so what is needed is shutter release control from a selfie stick button or other Bluetooth remote controller. The phone might be on a selfie stick or mounted in a VR viewer and pressing the screen shutter button is not possible.

3. When the photo or video is transferred to the phone it would be very helpful to identify the camera source in the date/time filename as follows: for stereo twin cameras append _1 and _2 as a suffix to consistently identify the camera source. Do this for 2 to 5 ( _1, _2, _3, _4,  _5 ) cameras. This way I know which file came from which camera for later stereo editing or multi-camera usage.

For stereo photography this combination of cameras, Remote PlayMemories app,  3D viewing lenses, and Google Cardboard work quite well for me.

Fall Colors 3D

Fall Colors in 3D

Formatted for viewing with a stereoscope


Zombie Photo Shoot 3D


My Halloween 3D photos from the Zombie Makeup Photo Shoot.

Alexandra Ley, Makeup Artist (right), prepares models during the Philadelphia Glamour Photography meetup, October 4, 2015.

These photos are formatted for viewing with a stereoscope only.


Zombie Photo Shoot

Mattel View-Master VR Viewer


UPDATED 2015/10/20:

I have been eagerly awaiting the in-store arrival of the new Mattel View-Master VR (virtual reality) Viewer and it is now available for purchase from my local Target store. Here's a photo of the Mattel View-Master VR Viewer I bought a few days ago. My goal was to see if Cardboard VR apps I'm writing, need to be modified for use with this viewer. Second I wanted to see how Mattel's app's user interface works.

The viewer's operational design is based on Google Cardboard version 2. With this version you pull a lever to tap the screen for controlling VR apps that run on your smartphone mounted in the headset. The first version of Cardboard used a magnet "lever" which did not work with all phones.

I found the viewer to be solidly made and it held my phone securely. The rubberized head cup is very comfortable. There is a wrist strap but no head mounting strap, so you need two hands to operate it safely to avoid accidentally dropping the viewer. Mattel's VR viewer costs about 3 times as much as a cardboard headset, but it is worth it. One problem I had with the viewer was the lever's touch pad point often failed to retract to its home position after striking the screen, unless I quickly snapped the lever. I exchanged this viewer with Target and the replacement unit works fine. I  use a bluetooth controller/keyboard with most of my Cardboard apps making the lever less important for my apps.


I noticed the phone display is blurry when I wear my bi-focal glasses for normal vision. There is no adjustment possible for changing the viewing distance from the lens to the phone screen nor the lens separation distance to match different people. With my glasses off the screen is in sharp focus.  I have read at least one report that some people have problems with a blurry screen and they decided to return their unit. When I used the viewer all day to view my stereo 3D photos I shot, I got eyestrain. This could be a problem with my 3D photos not all being optimized for a comfortable viewing experience or the length of time I spent with the viewer (all day).

Mattel's VR viewer presents an immersive experience since you cannot see any sidewalls of the viewer's interior. You need to turn your head to see everything. The narrow field of view made watching my 3D stereo photos only partially visible, since not all of the photo was visible. This is an issue with an app I wrote to view my photos.

Following setup instructions, configuration went smoothly using a QR code inside the headset.


The viewer includes a Starter Pack disk that allows access to three sample VR apps.  My phone is an Sony Xperia Z1S (screen 1920x1080 pixels) which is not one of the supported phones for the View-Master VR as currently published by Mattel. I had a lot of trouble launching (getting the floating augmented reality image to appear in the camera view)  the three sample VR apps (Destinations, Space, and Wildlife) from Mattel. I have a hunch the issue is with my phone camera, since I was not able to easily launch Mattel's apps VR presentation consistently. It took too much time fiddling.

UPDATE 2015/10/20:
When I removed the View-Master's plastic cover over the lens of my phone's camera, I was able to launch the sample VR apps without any problems.


One annoying aspect trying to get the Mattel apps to launch with my Sony phone was a dreaded screen with the text "REMOVE DEVICE FROM HEADSET".  The only way I could bypass this screen was to fully exit the app and start all over, after removing my phone from the viewer. Sometimes I got this screen when the phone was not even in the viewer.


Once I was able to successfully launch one of the starter apps, with practice it was possible to navigate the various views and it was a worthwhile experience. The experience made me wish for a phone with a better higher resolution display. I liked the Space pack best. Not sure these apps are compelling enough to go back to try and launch again, given the difficulty launching the VR presentation with my Sony phone.


Note that phone controls like the volume buttons, camera shutter button, headphone jack, and USB port are not accessible once the phone is mounted in the viewer. Some hack modifications to the viewer I  am thinking about are to drill a hole to open an access hole to the USB port on the phone for app development.


Mattel's View-Master web site: http://www.view-master.com

View-Master is a trademark of Mattel, Inc.
Google Cardboard is a trademark of Google Inc.


Free Mosquito Swarm 3D Game in Google Play Store


Hey everyone with an Android phone - I posted a beta test version of my mosquito Swarm 3D/VR Game to the Google Play Store. The game is still under development and is intended for the Google Cardboard VR (virtual reality) headsets. In this game you aim with head movement and swat mosquitoes  to score points, all in 3D. The code for this game was written with Processing-Cardboard SDK.

If you would like to try this arcade style game please register at the link below to download the free game.

https://play.google.com/apps/testing/com.modla.andy.swarm3dfree

Hope you enjoy it and your comments are appreciated.

My Swarm 3D/VR Game for Google Cardboard


I have been working on a 3D/VR game for Google Android Cardboard and finally have something I can demo. It's a work in progress and is not ready for publication.

I recorded this video to demo my Swarm 3D/VR game. The object of the game is to swat a swarm of mosquitoes and avoid being bitten to score points.

I wrote it with my open source Processing - Android - Cardboard development kit. It has only been tested on my Sony Xperia Z1S phone and this is a video recording is directly from that phone at 1080p.

A link to open source code for the Processing-Cardboard SDK is

https://github.com/ajavamind/Processing-Cardboard

Here is link to my blog description of the SDK:

http://andymodlaphotography.blogspot.com/2015/07/write-google-cardboard-vr-apps-with.html

PlayStation VR

Check out this PlayStation VR announcement:


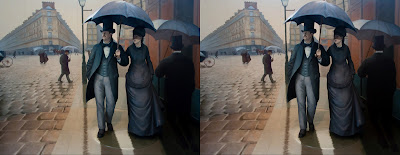
Paris Street, Rainy Day

3D photo of  Sculpture "La Promenade"  (1999) by Seward Johnson, an Interpretation of  "Paris Street, Rainy Day" (1877) by Gustave Caillebotte, Grounds for Sculpture, Hamilton, NJ

My 3D photo above is an example of the convergence of painting, sculpture, and photography. 

A recent article in the Wall Street Journal's Arts in Review, August 4, 2015, "Out of the Shadows Again" by author Karen Wilkin discusses Gustave Caillebotte's work being shown at the National Gallery of Art, Washington D.C.

To quote Ms Wilkin:  Caillebotte's street "paintings are remarkable for plunging perspectives and a sense of immediacy, characteristics that led to comparisons with photography - yet another aspect of modernite".

Seward Johnson's interpretation of Caillebotte's masterpiece in sculpture form is "La Promenade" photographed in 3D stereo at The Retrospective exhibit of Johnson's work, Grounds for Sculpture, Hamilton, NJ, 2014.

Write Google Cardboard VR Apps with Processing

Here's a screenshot photo of a demonstration Android app I wrote to show the use of the "Processing" language to create an Android phone application for the Google Cardboard VR (Virtual Reality) headset. 

This short video shows user interaction with the screen to rotate a photo cube. When installed in the Cardboard headset the user can explore the stereo photos displayed on the cube zooming in or panning left and right. I also demonstrate how graphics and text may be drawn with Processing.

"Processing" is a Java based programming language, library, and development environment designed for visual artists, designers, and programmers. I merged the Processing for Android core library with the Google Cardboard SDK so that anyone can write Cardboard VR apps using Processing. At this stage Android Studio is needed to develop code since a Processing-Cardboard library is not yet available to use in the PDE (Processing Development Environment) tool. The technical details about the project are on GitHub.

This open source code is available at: https://github.com/ajavamind/Processing-Cardboard   

My example code displays a stereo photo cube in front of a stereo photo background. In a Cardboard viewer the user may change the viewing angle and size of the cube with head movement. A screen tap,  magnet pull, or Bluetooth keyboard enter key will bring the cube back to its original viewing location. Tilting the viewer left or right will change the cube size. 

Moving your finger on the display will rotate the cube for a different photo view. I can also rotate the cube by connecting a USB mouse to my phone through a USB OTG Host cable adapter. Dragging the mouse cursor rotates the photo cube.


UPDATE 2016-01-24
Source code updated for Processing Android version 3.
See http://andymodlaphotography.blogspot.com/2016/01/processing-for-google-cardboard-vr.html


Processing Sketches Using Android Studio


Processing, the programming language, library, and development environment for Artists and Visual Designers can generate Android apps.  This feature allows you to see your visual programming creations on an Android phone or tablet. If you have some experience with Android Studio, you might want to use it to develop your Android Processing code instead of Processing's development environment to gain access to a debugger and powerful source editor, etc.

I posted an example Processing Android Sketch project on GitHub that is a starting point you can use for writing processing code using Android Studio.

https://github.com/ajavamind/ProcessingAndroidSketch

Eclipse has been used as an alternative to the Processing development environment and there is a tutorial at  https://processing.org/tutorials/eclipse/ that describes how to do it. There is also a web page for processing-android information that has a paragraph on using Eclipse for Processing Development at:
https://github.com/processing/processing-android/wiki   Here I take it a step further and show how to I use Android Studio as an alternate development environment for Processing.

First I created a new blank Activity project in Android Studio. I chose the  minimum target API 16, Android 4.1 selection.  Next I downloaded a zip file of the Processing-Android libraries from  https://github.com/processing/processing-android

From the unzipped file, processing-android-master.zip, I copied the core source code from the "processing" folder at K:\downloads\processing.org\processing-android-master\core\src to my Android project at C:\Users\Andy\Documents\projects\android\ProcessingSketch\app\src\main\java. I chose to do this instead of creating a separate jar file for Processing-Android so I could study and better understand the internal workings of Processing and tinker with it.

Processing-Android has some data resource files within its java source files. This does not work with Android. The solution is to create an "assets" folder under your project "main". Then add sub folders "processing/opengl" and move the "processing/opengl/shaders" folder with its content into  the "opengl" folder you created. I modified all the paths to these shader resources by prefixing path strings with "/assets/" in the PGraphicsOpenGL.java file. Synchronize the project so it will see the folders you changed or added.

For the kinds of sketches I might want to experiment with, I modified the AndroidManifest.xml file by adding the following permissions and features:

<uses-permission android:name="android.permission.NFC" />
<uses-permission android:name="android.permission.READ_EXTERNAL_STORAGE" />
<uses-permission android:name="android.permission.WRITE_EXTERNAL_STORAGE" />
<uses-permission android:name="android.permission.BLUETOOTH"/>
<uses-permission android:name="com.sonymobile.permission.SYSTEM_UI_VISIBILITY_EXTENSIONS"/>
<uses-permission android:name="android.permission.INTERNET" />
<uses-permission android:name="android.permission.VIBRATE" />
<uses-feature android:glEsVersion="0x00020000" android:required="true" />
<uses-sdk android:minSdkVersion="16" android:targetSdkVersion="19"/>


In the MainActivity.java file I modified MainActivity to extend PApplet as follows:

public class MainActivity extends PApplet {
    private static String TAG = "MainActivity";

The import for PApplet package should be added if it was not done automatically.

From MainActivity.java in onCreate(), I also removed setting content view by commenting the line:

  //setContentView(R.layout.activity_main); 

This change prevents overwriting Processing's content view, otherwise you will not see Processing visuals. Other minor updates making onCreate public were also made.

Now in the MainActivity.java file I added Processing settings(), setup(), and draw() functions. You can only call the size()  and fullscreen() functions in  settings() , not in setup(). I used size(1920,1080,OPENGL) to match my phones capabilities and called fullscreen();

All these changes become clear in the example I posted on GitHub. The example code draws lines on the screen while you use your finger as a mouse on the screen.

Android Studio is an advanced integrated development environment (IDE), so you get a debugger and source code tools not available in Processing IDE. If you write code with the Processing IDE, you will find this to be a very handy tool to have.

Stereo Photo Cube App for Cardboard Viewer


Here's a screen display for an Android app I wrote in the Processing language/library framework. It displays a photo cube. When viewed with a Google Cardboard VR viewer (as a stereoscope), the cube will appear in 3D and since one photo is a left and right stereo pair, that photo will appear in 3D in the cube. The cube can be rotated using the arrow keys with a bluetooth keyboard connected to the phone or by dragging your finger across the screen.

You can try this yourself with code I posted on GitHub at:

The stereo display framework code is based on work done at:

I simplified the Stereo.java library code to only use Processing P3D/OPENGL library calls. I did this because I could not get the CreativeCodingLab implementation to work as written with the OpenGL ES libraries that were needed to build. It turned out Processing-Android P3D/OPENGL has everything I need, for this project at least.

Processing 2.2.1 in the Android build Mode (target 4.0.4) with Sony Z1S phone running Android 5.0.2,